

•
작성자 : 상암고 교사 성원경
•
강의 : 영등포고등학교
•
작성일 : 24년 10월
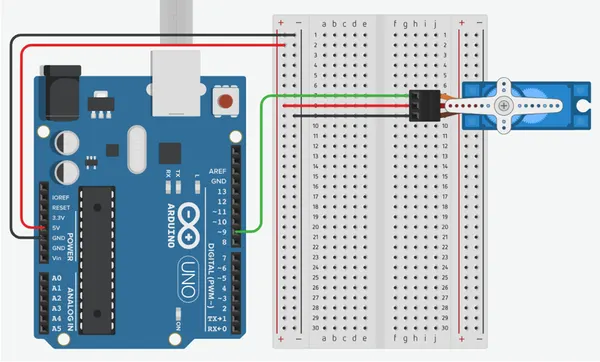
서보모터
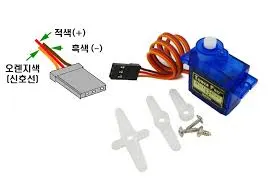

#include <Servo.h> // 서보 라이브러리 포함
Servo myServo; // 서보 객체 생성
void setup() {
myServo.attach(9); // 서보를 9번 핀에 연결
}
void loop() {
myServo.write(0); // 서보를 0도로 이동
delay(1000); // 1초 대기
myServo.write(90); // 서보를 90도로 이동
delay(1000); // 1초 대기
myServo.write(180); // 서보를 180도로 이동
delay(1000); // 1초 대기
}
C
복사
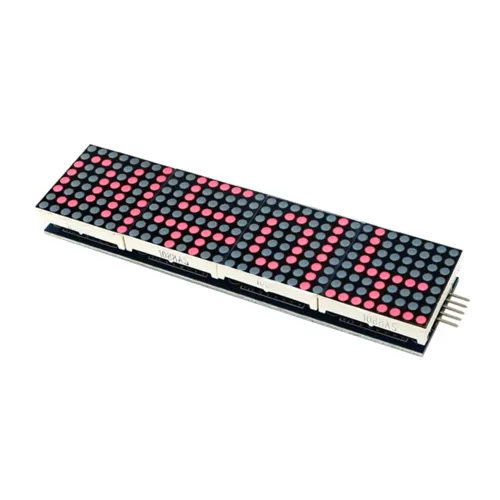
DotMatrix
•
기본 설명 및 연결 방법
#include "LedControl.h"
LedControl lc=LedControl(12,11,10,4);
// DIN 핀을 12번에 CS 핀을 10번에 CLK핀을 11번에 연결해줌
// (DIN, CLK, CS, 연결할 도트 매트릭스의 개수)
#define A { \
{0, 0, 0, 1, 1, 0, 0, 0}, \
{0, 0, 1, 1, 1, 1, 0, 0}, \
{0, 1, 1, 0, 0, 1, 1, 0}, \
{0, 1, 1, 1, 1, 1, 1, 0}, \
{0, 1, 1, 1, 1, 1, 1, 0}, \
{0, 1, 1, 0, 0, 1, 1, 0}, \
{0, 1, 1, 0, 0, 1, 1, 0}, \
{0, 1, 1, 0, 0, 1, 1, 0} \
}
#define B { \
{0, 1, 1, 1, 1, 1, 0, 0},\
{0, 1, 1, 0, 0, 1, 1, 0},\
{0, 1, 1, 0, 0, 1, 1, 0},\
{0, 1, 1, 1, 1, 1, 0, 0},\
{0, 1, 1, 1, 1, 1, 0, 0},\
{0, 1, 1, 0, 0, 1, 1, 0},\
{0, 1, 1, 0, 0, 1, 1, 0},\
{0, 1, 1, 1, 1, 1, 0, 0},\
}
#define C { \
{0, 0, 1, 1, 1, 1, 1, 0},\
{0, 1, 1, 1, 1, 1, 1, 0},\
{0, 1, 1, 0, 0, 0, 0, 0},\
{0, 1, 1, 0, 0, 0, 0, 0},\
{0, 1, 1, 0, 0, 0, 0, 0},\
{0, 1, 1, 0, 0, 0, 0, 0},\
{0, 1, 1, 1, 1, 1, 1, 0},\
{0, 0, 1, 1, 1, 1, 1, 0},\
}
#define D { \
{0, 1, 1, 1, 1, 1, 0, 0},\
{0, 1, 1, 1, 1, 1, 1, 0},\
{0, 1, 1, 0, 0, 1, 1, 0},\
{0, 1, 1, 0, 0, 1, 1, 0},\
{0, 1, 1, 0, 0, 1, 1, 0},\
{0, 1, 1, 0, 0, 1, 1, 0},\
{0, 1, 1, 1, 1, 1, 1, 0},\
{0, 1, 1, 1, 1, 1, 0, 0},\
}
byte patterns[4][8][8] = { A, B, C, D };
// 위에서 정의한 led 모양을 patterns에 입력해 주기
void setup()
{
for(int i=0; i<4; i++){ // 도트 매트릭스 0~3번
lc.shutdown(i,false); // 디스플레이 초기화
lc.setIntensity(i,1); // 도트 매트릭스 밝기 (매트릭스 번호, 밝기) 1~15
lc.clearDisplay(i); // led 를 전체 꺼주는 함수
}
}
void clean(){ // 전체led를 꺼주는 함수
for(int i = 0; i < 4; i++)
lc.clearDisplay(i);// clear screen
}
void loop(){
int pattern = 4;
int row, col, i;
for(i = 0; i < 4; i++){ // 총 4글자 반복
for (row = 0; row < 8; row++) { // row 출력
for (col=0; col < 8; col++){ // col 출력
if (patterns[i][7 - col][7 - row] == 1)
// 위의 배열에서 1일때 해당되는 위치 불빛 켜주기
lc.setLed(i, col, row, true);
else // 위 배열에서 0일때 해당되는 위치 불빛 꺼주기
lc.setLed(i, col, row, false);
}
}
delay(500); // 딜레이 500ms
}
clean(); // led 전체 꺼주기
delay(500); // 딜레기 500ms
}
C
복사
•
도트매트릭스 글씨 생성기

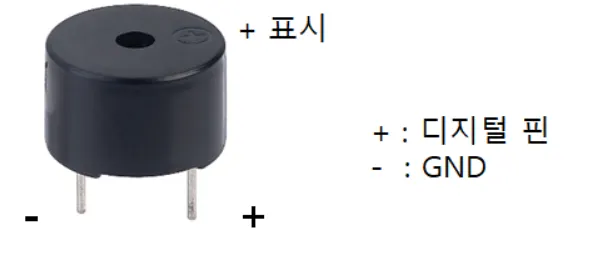
부저
•
기본 설명

•
테스트 코드
// 피에조부저 테스트하기
int piezo = 3; // 피에조 부저 톤 조절을 위해 3번 핀 사용
int del = 1000; // del이라는 변수에 숫자 1000을 저장
void setup() // 어떤 디지털 핀을 사용할지 설정
{
pinMode(piezo, OUTPUT); // 피에조 부저 제어를 위한 3번 디지털 핀 사용
}
//피에조 부저에서 소리를 내게 하자
void loop()
{
analogWrite(piezo, 64); // PWM 25% 적용
delay(del); // 1초 대기
analogWrite(piezo, 128); // PWM 50% 적용
delay(del); // 1초 대기
analogWrite(piezo, 256); // PWM 100% 적용
delay(del); // 1초 대기
}
C
복사
•
생일 축하 노래 코드

// 생일 축하 노래 음의 주파수 설정
int melody[] = {
262, 262, 294, 262, 349, 330, 262, 262, 294, 262, 392, 349, 262, 262, 523, 440, 349, 330, 294, 466, 466, 440, 349, 392, 349
};
// 음 길이 (8분음표 기준으로 설정)
int noteDurations[] = {
8, 8, 4, 4, 4, 2, 8, 8, 4, 4, 4, 2, 8, 8, 4, 4, 4, 4, 4, 8, 8, 4, 4, 4, 2
};
void setup() {
// 부저 핀 설정
for (int thisNote = 0; thisNote < 25; thisNote++) {
// 각 음의 지속 시간 계산 (기본 1초 = 1000밀리초)
int noteDuration = 1000 / noteDurations[thisNote];
// 주어진 주파수로 부저에서 소리 출력
tone(8, melody[thisNote], noteDuration);
// 음 간의 쉬는 시간 설정
int pauseBetweenNotes = noteDuration * 1.30;
delay(pauseBetweenNotes);
// 소리 중지
noTone(8);
}
}
void loop() {
// 반복할 내용 없음
}
C
복사
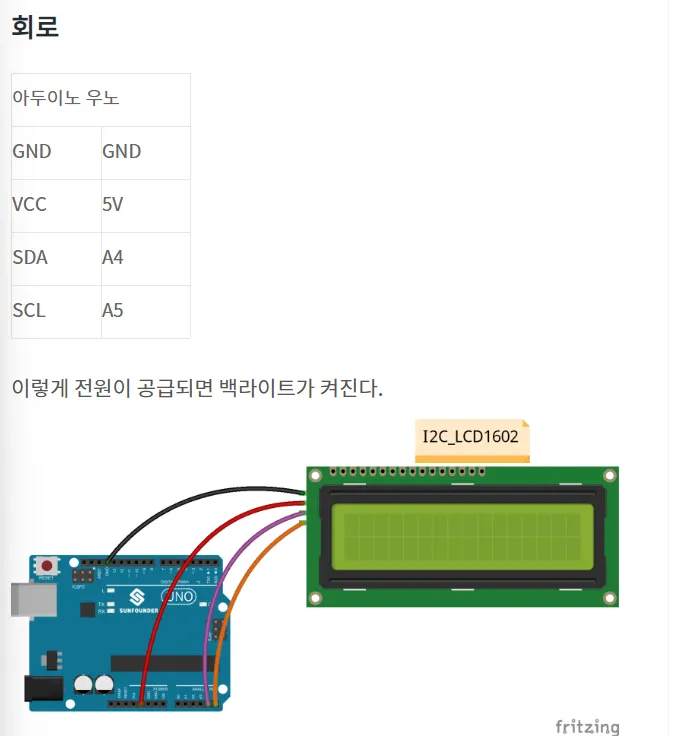
LCD(I2c)
•
주소값 찾기 코드
//Written by Nick Gammon
#include <Wire.h>
void setup() {
Serial.begin (9600);
// Leonardo: wait for serial port to connect
while (!Serial)
{
}
Serial.println ();
Serial.println ("I2C scanner. Scanning ...");
byte count = 0;
Wire.begin();
for (byte i = 8; i < 120; i++)
{
Wire.beginTransmission (i);
if (Wire.endTransmission () == 0)
{
Serial.print ("Found address: ");
Serial.print (i, DEC);
Serial.print (" (0x");
Serial.print (i, HEX);
Serial.println (")");
count++;
delay (1); // maybe unneeded?
} // end of good response
} // end of for loop
Serial.println ("Done.");
Serial.print ("Found ");
Serial.print (count, DEC);
Serial.println (" device(s).");
} // end of setup
void loop() {}
C
복사
•
기본 동작 코드
#include <LiquidCrystal_I2C.h> // including header
LiquidCrystal_I2C lcd(0x27,16,2); // set the LCD address to 0x3F for a 16 chars and 2 line display
// (주소값, 16x2 디스플레이)
void setup() {
lcd.init(); // lcd 객체 초기화
lcd.clear(); // 화면 지우고 커서를 왼쪽 상단 모서리로 옮김
lcd.backlight(); // Make sure backlight is on // 백라이트 on
// Print a message on both lines of the LCD.
lcd.setCursor(2,0); //Set cursor to character 2 on line 0 // 커서 옮김. 0행에 2열
lcd.print("Hello world!"); // 문자 출력
lcd.setCursor(0,1); //Move cursor to character 2 on line 1 // 커서 옮김. 1행에 0열
lcd.print("HA! HA! HA!");
}
void loop() {
}
C
복사
•
만약 한글을 출력하고 싶다면 아래 자료 참고
