

목차
피미1. 미디어 파이프 구동하기
피미2. 시리얼 통신 테스트
피미3. 미디어파이프와 피코 시리얼 통신 연동하기
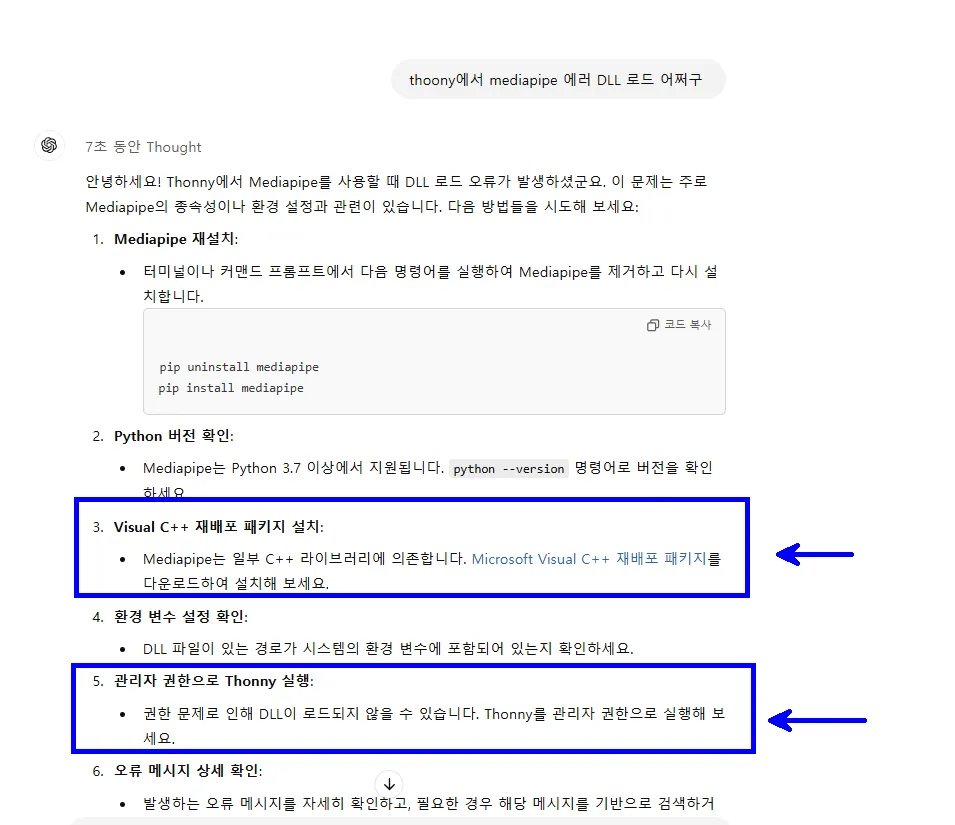
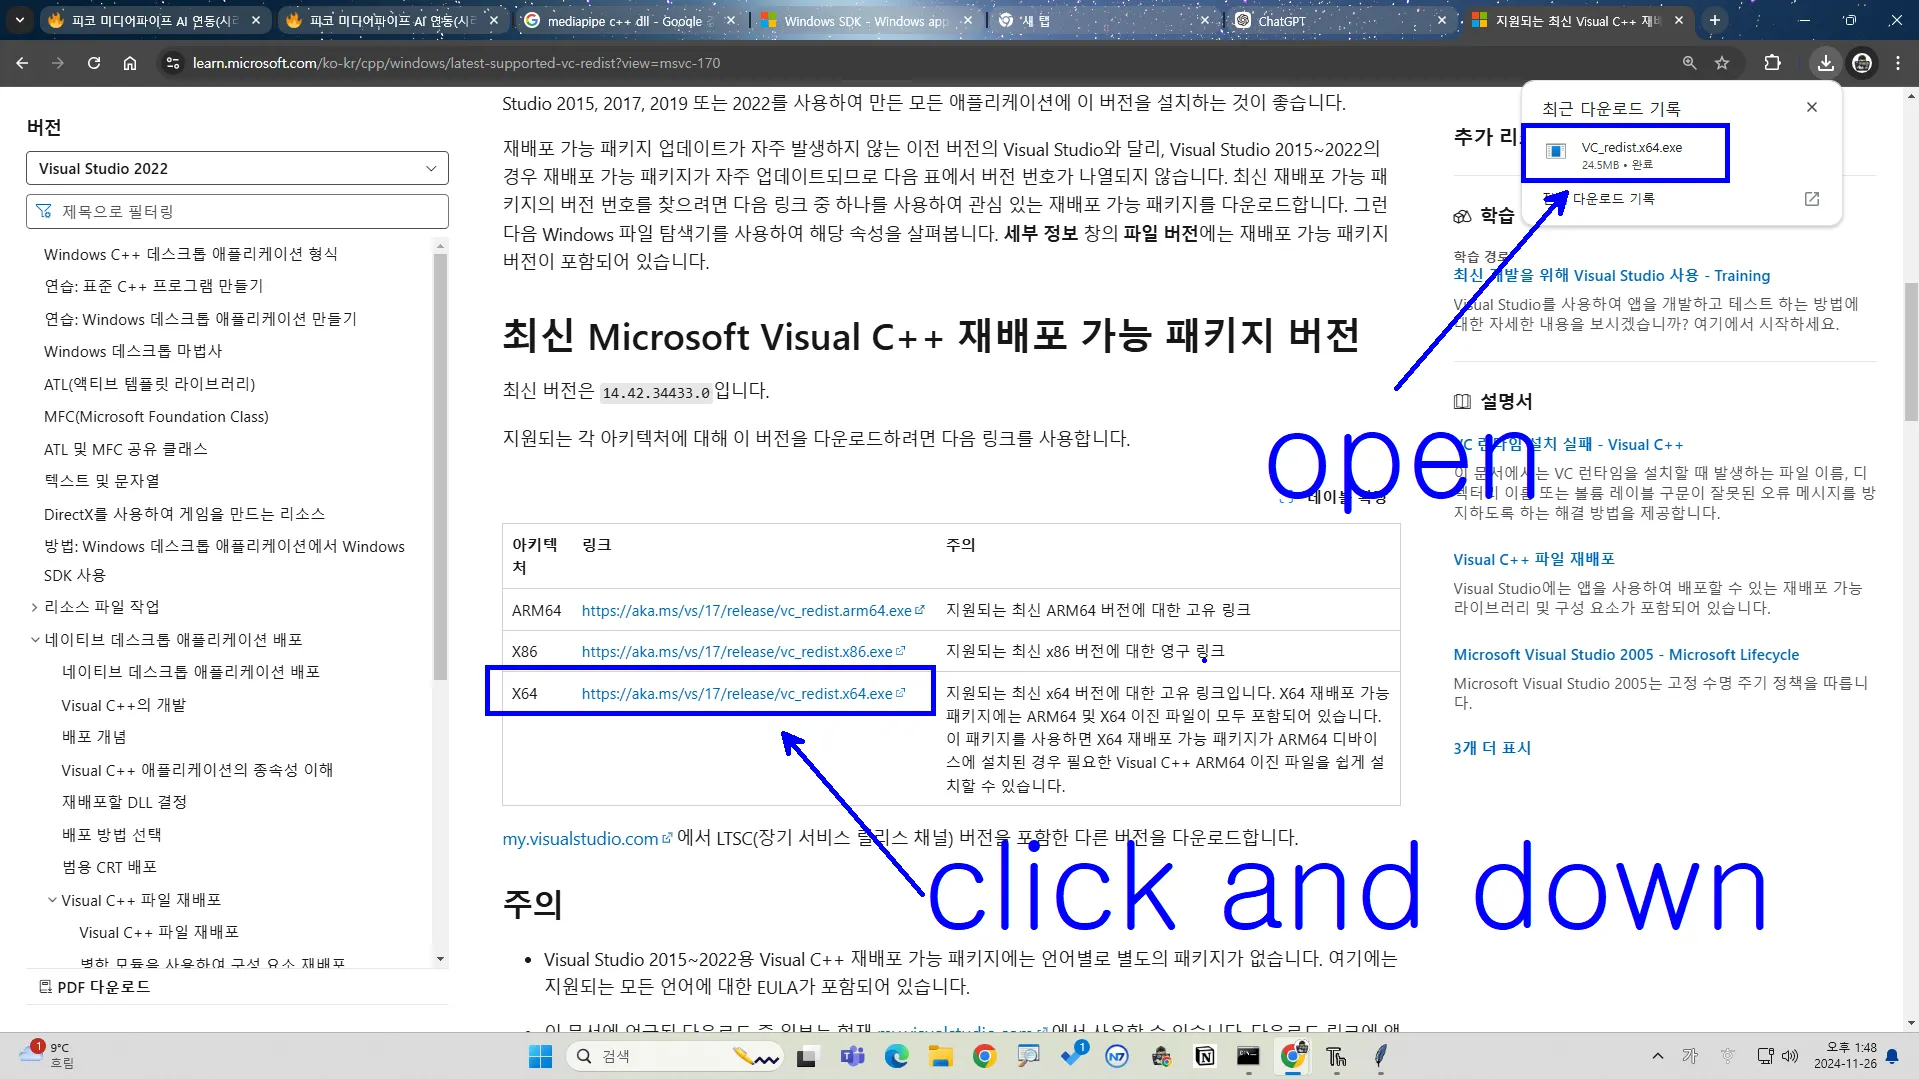
(주의)Thoony 환경에서 mediapipe 구동시 안될 때
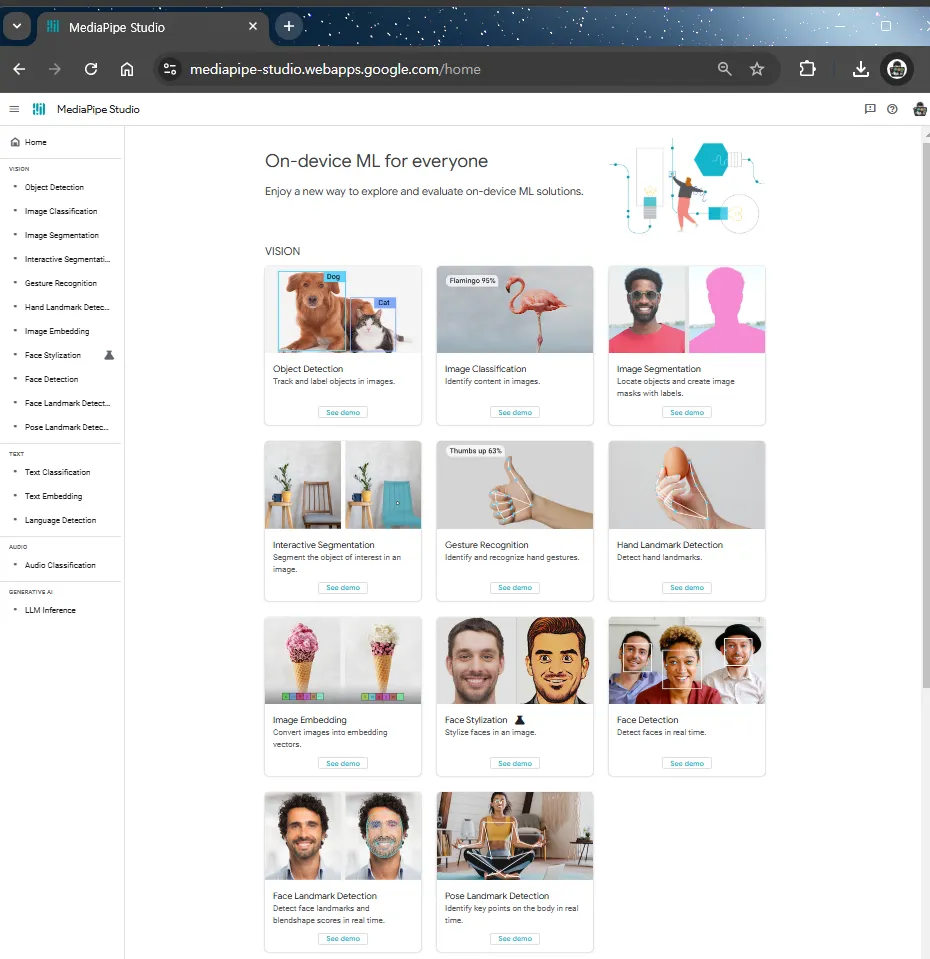
미디어파이프 살펴보기
•
미디어파이프 스튜디오(개인 구글계정 로그인 필요) : mediapipe-studio.webapps.google.com
피미1. 미디어 파이프 구동하기


import cv2
import mediapipe as mp
# 미디어파이프 손인식 모듈 초기화
mp_hands = mp.solutions.hands
hands = mp_hands.Hands()
mp_draw = mp.solutions.drawing_utils
# 웹캠 영상 캡처 객체 생성
cap = cv2.VideoCapture(0)
while True:
success, img = cap.read()
if not success:
break
# 이미지 색상 변환 (BGR에서 RGB로)
img_rgb = cv2.cvtColor(img, cv2.COLOR_BGR2RGB)
# 손 랜드마크 감지
results = hands.process(img_rgb)
if results.multi_hand_landmarks:
for hand_lms in results.multi_hand_landmarks:
# 랜드마크와 연결선 그리기
mp_draw.draw_landmarks(img, hand_lms, mp_hands.HAND_CONNECTIONS)
# 결과 영상 출력
cv2.imshow("Hand Recognition", img)
if cv2.waitKey(1) & 0xFF == ord('q'):
break
# 자원 해제
cap.release()
cv2.destroyAllWindows()
Python
복사
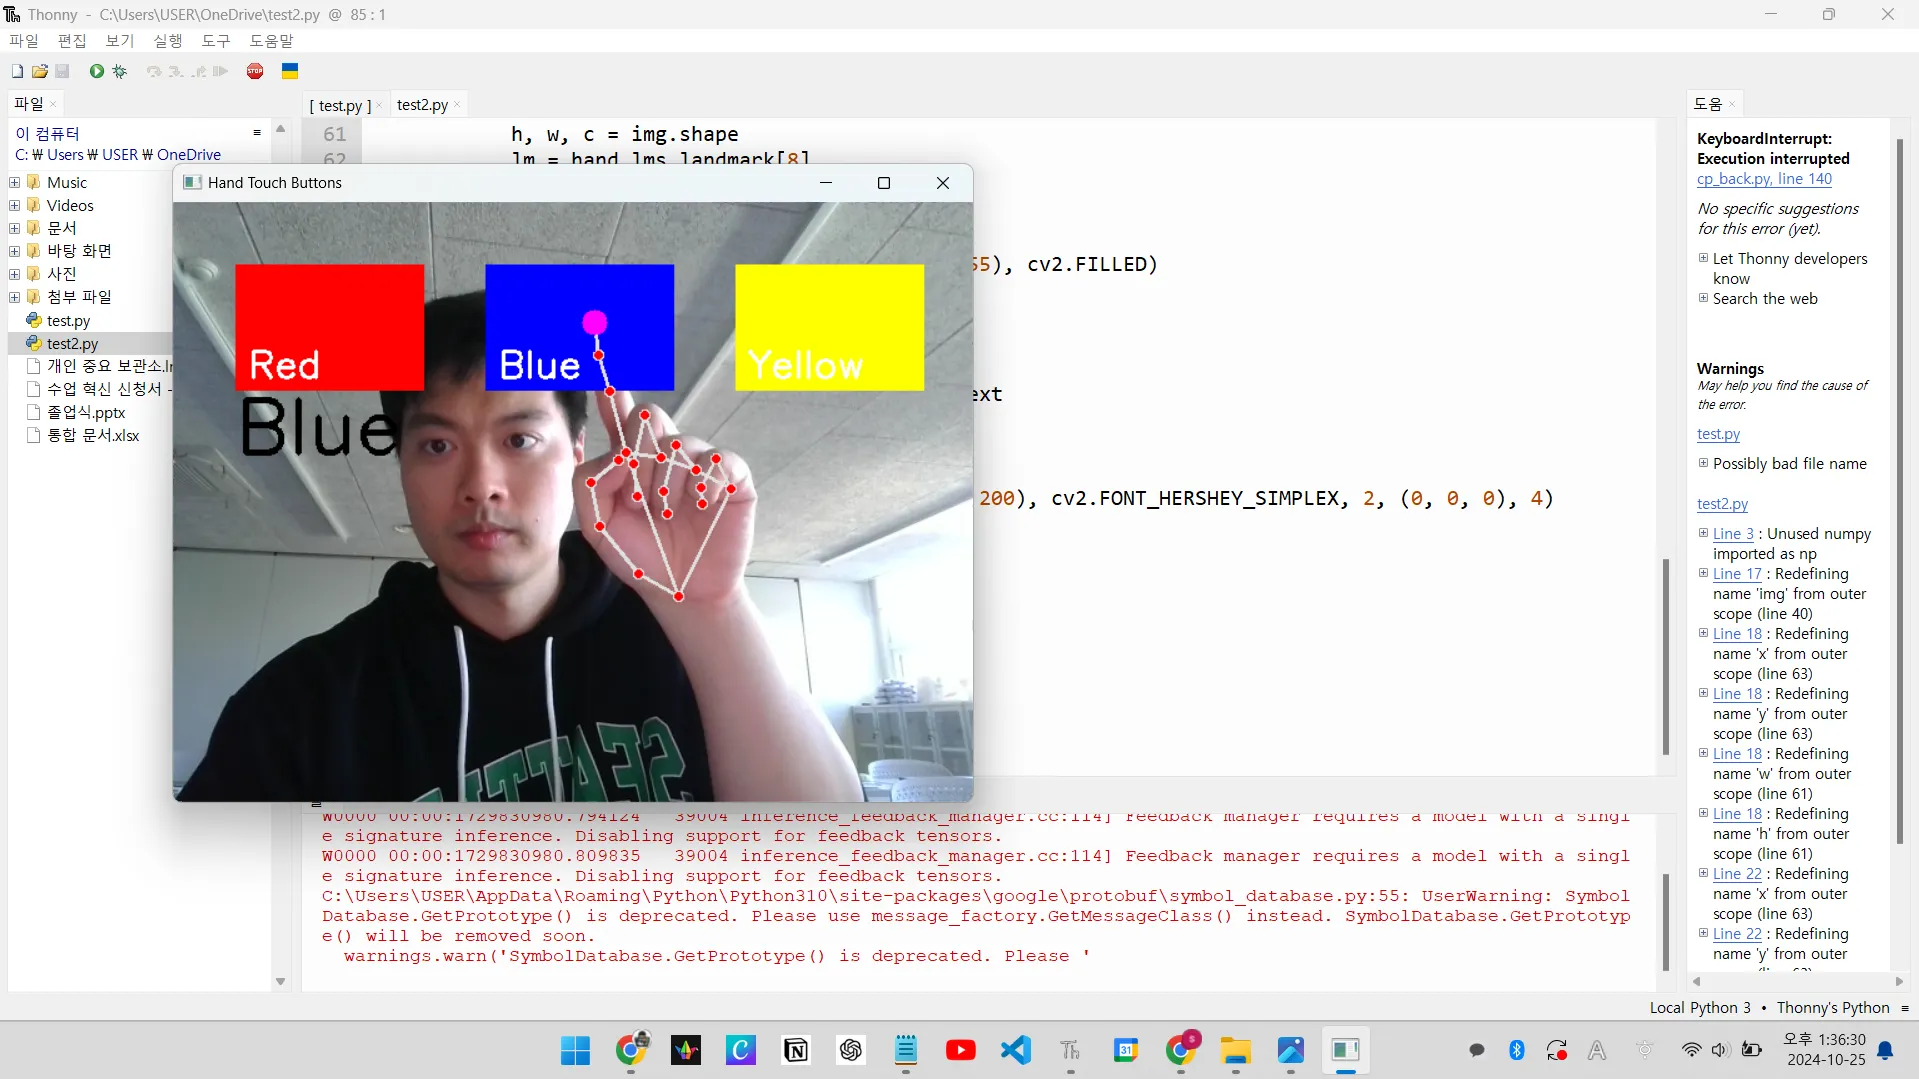
import cv2
import mediapipe as mp
import numpy as np
# 미디어파이프 손인식 모듈 초기화
mp_hands = mp.solutions.hands
hands = mp_hands.Hands(max_num_hands=1) # 한 손만 인식하도록 설정
mp_draw = mp.solutions.drawing_utils
# 버튼 클래스 정의
class Button:
def __init__(self, pos, text, color):
self.pos = pos # (x, y, width, height)
self.text = text
self.color = color
def draw(self, img):
x, y, w, h = self.pos
cv2.rectangle(img, (x, y), (x + w, y + h), self.color, cv2.FILLED)
cv2.putText(img, self.text, (x + 10, y + h - 10), cv2.FONT_HERSHEY_SIMPLEX, 1, (255, 255, 255), 2)
def is_pressed(self, x, y):
bx, by, bw, bh = self.pos
if bx < x < bx + bw and by < y < by + bh:
return True
return False
# 버튼 생성
buttons = [
Button((50, 50, 150, 100), "Red", (0, 0, 255)),
Button((250, 50, 150, 100), "Blue", (255, 0, 0)),
Button((450, 50, 150, 100), "Yellow", (0, 255, 255))
]
# 웹캠 영상 캡처 객체 생성
cap = cv2.VideoCapture(0)
selected_color_text = ""
while True:
success, img = cap.read()
if not success:
break
img = cv2.flip(img, 1) # 좌우 반전
# 이미지 색상 변환 (BGR에서 RGB로)
img_rgb = cv2.cvtColor(img, cv2.COLOR_BGR2RGB)
# 손 랜드마크 감지
results = hands.process(img_rgb)
# 버튼 그리기
for button in buttons:
button.draw(img)
if results.multi_hand_landmarks:
for hand_lms in results.multi_hand_landmarks:
# 랜드마크 그리기
mp_draw.draw_landmarks(img, hand_lms, mp_hands.HAND_CONNECTIONS)
# 검지 끝부분 좌표 가져오기 (랜드마크 번호 8번)
h, w, c = img.shape
lm = hand_lms.landmark[8]
x, y = int(lm.x * w), int(lm.y * h)
# 검지 끝에 원 그리기
cv2.circle(img, (x, y), 10, (255, 0, 255), cv2.FILLED)
# 버튼 터치 여부 확인
for button in buttons:
if button.is_pressed(x, y):
selected_color_text = button.text
# 선택된 색상 텍스트 출력
if selected_color_text != "":
cv2.putText(img, selected_color_text, (50, 200), cv2.FONT_HERSHEY_SIMPLEX, 2, (0, 0, 0), 4)
# 결과 영상 출력
cv2.imshow("Hand Touch Buttons", img)
if cv2.waitKey(1) & 0xFF == ord('q'):
break
# 자원 해제
cap.release()
cv2.destroyAllWindows()
Python
복사
•
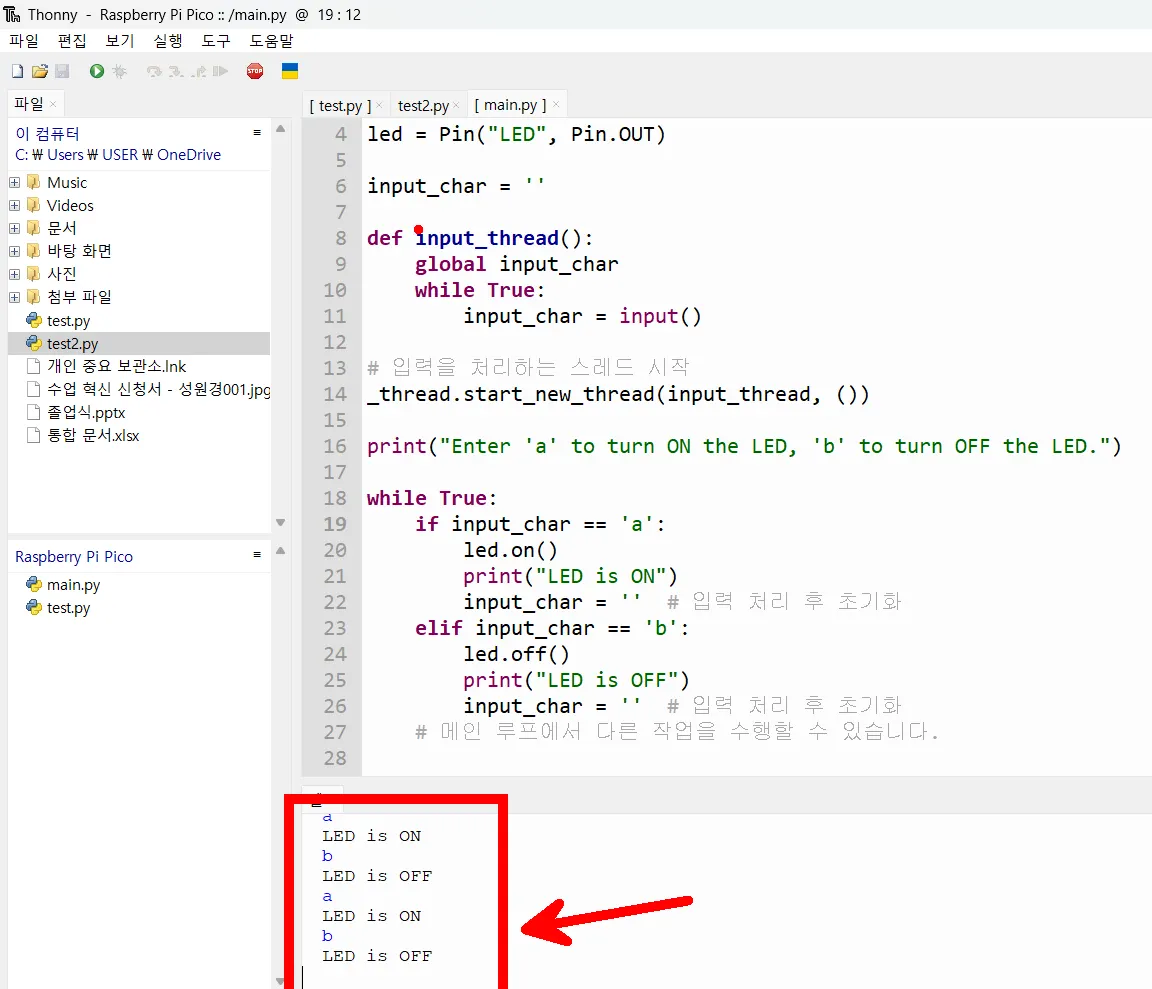
시리얼 통신 테스트
from machine import Pin
import _thread
led = Pin("LED", Pin.OUT)
input_char = ''
def input_thread():
global input_char
while True:
input_char = input()
# 입력을 처리하는 스레드 시작
_thread.start_new_thread(input_thread, ())
print("Enter 'a' to turn ON the LED, 'b' to turn OFF the LED.")
while True:
if input_char == 'a':
led.on()
print("LED is ON")
input_char = '' # 입력 처리 후 초기화
elif input_char == 'b':
led.off()
print("LED is OFF")
input_char = '' # 입력 처리 후 초기화
# 메인 루프에서 다른 작업을 수행할 수 있습니다.
Python
복사
•
미디어파이프 모델과 연동
◦
파이썬 측
import cv2
import mediapipe as mp
import numpy as np
import serial
import time
# 시리얼 포트 설정 (COM19)
ser = serial.Serial('COM19', 9600) # 포트와 보드레이트 설정
time.sleep(2) # 시리얼 통신 안정화 대기
# 미디어파이프 손인식 모듈 초기화
mp_hands = mp.solutions.hands
hands = mp_hands.Hands(max_num_hands=1) # 한 손만 인식하도록 설정
mp_draw = mp.solutions.drawing_utils
# 버튼 클래스 정의
class Button:
def __init__(self, pos, text, color):
self.pos = pos # (x, y, width, height)
self.text = text
self.color = color
def draw(self, img):
x, y, w, h = self.pos
cv2.rectangle(img, (x, y), (x + w, y + h), self.color, cv2.FILLED)
cv2.putText(img, self.text, (x + 10, y + h - 10), cv2.FONT_HERSHEY_SIMPLEX, 1, (255, 255, 255), 2)
def is_pressed(self, x, y):
bx, by, bw, bh = self.pos
if bx < x < bx + bw and by < y < by + bh:
return True
return False
# 버튼 생성
buttons = [
Button((50, 50, 150, 100), "Red", (0, 0, 255)),
Button((250, 50, 150, 100), "Blue", (255, 0, 0)),
Button((450, 50, 150, 100), "Yellow", (0, 255, 255))
]
# 웹캠 영상 캡처 객체 생성
cap = cv2.VideoCapture(0)
selected_color_text = ""
prev_selected_color = ""
while True:
success, img = cap.read()
if not success:
break
img = cv2.flip(img, 1) # 좌우 반전
# 이미지 색상 변환 (BGR에서 RGB로)
img_rgb = cv2.cvtColor(img, cv2.COLOR_BGR2RGB)
# 손 랜드마크 감지
results = hands.process(img_rgb)
# 버튼 그리기
for button in buttons:
button.draw(img)
if results.multi_hand_landmarks:
for hand_lms in results.multi_hand_landmarks:
# 랜드마크 그리기
mp_draw.draw_landmarks(img, hand_lms, mp_hands.HAND_CONNECTIONS)
# 검지 끝부분 좌표 가져오기 (랜드마크 번호 8번)
h, w, c = img.shape
lm = hand_lms.landmark[8]
x, y = int(lm.x * w), int(lm.y * h)
# 검지 끝에 원 그리기
cv2.circle(img, (x, y), 10, (255, 0, 255), cv2.FILLED)
# 버튼 터치 여부 확인
for button in buttons:
if button.is_pressed(x, y):
selected_color_text = button.text
# 이전에 선택된 색상과 다를 때만 시리얼로 전송
if selected_color_text != prev_selected_color:
# 색상에 따른 명령어 전송
if selected_color_text == "Red":
ser.write(b'RED\n')
elif selected_color_text == "Blue":
ser.write(b'BLUE\n')
elif selected_color_text == "Yellow":
ser.write(b'YELLOW\n')
prev_selected_color = selected_color_text
else:
selected_color_text = ""
prev_selected_color = ""
# 선택된 색상 텍스트 출력
if selected_color_text != "":
cv2.putText(img, selected_color_text, (50, 200), cv2.FONT_HERSHEY_SIMPLEX, 2, (0, 0, 0), 4)
# 결과 영상 출력
cv2.imshow("Hand Touch Buttons", img)
if cv2.waitKey(1) & 0xFF == ord('q'):
break
# 자원 해제
cap.release()
cv2.destroyAllWindows()
ser.close()
Python
복사
•
피코 측 : 마이크로 파이썬
import machine
import utime
import sys
import uselect
# LED 핀 설정
led_red = machine.Pin(27, machine.Pin.OUT)
led_blue = machine.Pin(18, machine.Pin.OUT)
led_yellow = machine.Pin(22, machine.Pin.OUT)
def turn_off_all_leds():
led_red.value(0)
led_blue.value(0)
led_yellow.value(0)
turn_off_all_leds()
print("Ready to receive commands via USB Serial")
# uselect 모듈을 사용하여 stdin에 대한 폴링 객체 생성
poll = uselect.poll()
poll.register(sys.stdin, uselect.POLLIN)
while True:
# 100ms의 타임아웃을 가진 폴링
events = poll.poll(100)
if events:
command = sys.stdin.readline().strip()
print("Received command:", command)
turn_off_all_leds()
if command.upper() == 'RED':
led_red.value(1)
print("Red LED ON")
elif command.upper() == 'BLUE':
led_blue.value(1)
print("Blue LED ON")
elif command.upper() == 'YELLOW':
led_yellow.value(1)
print("Yellow LED ON")
else:
print("Unknown command.")
utime.sleep(0.1)
Python
복사